AUDIO TOOLS HUB · NAVIGATION BY GOAL · UPDATED 2026-11-06
Audio Tools: Choose MIDI, WAV, Sheet Music or Instrument Path
This audio tools hub routes you by goal — editable MIDI notes, an uncompressed WAV, sheet music, or an instrument-specific path — then deep-links to the matching free in-browser converter. There is no converter on this URL itself. Pick a branch below, or skim the full tool table. Highlighted today: MP3 to WAV when you need PCM for a DAW or timeline. Limits on converter pages are typically one file, often 50 MB / 3 minutes for audio→MIDI (MIDI→audio pages state their own caps).
Which audio tool do I need? (decision tree)
Start with what you want out — not with the file extension. This tree is this hub’s navigation method (not an industry standard ranking claim).
I need editable notes (MIDI)
Go to the homepage MP3 to MIDI converter for MP3/WAV/M4A/FLAC and more, or audio to MIDI converter for formats, free limits and no-upload proof. Already have WAV? Use WAV to MIDI. Video file? MP4 to MIDI.
I need an uncompressed WAV (or reverse: MIDI → audio)
MP3 → PCM: MP3 to WAV (sample rate, bit depth, channels, presets). Notes → audio: MIDI to WAV or MIDI to MP3.
I need sheet music / a score
Use audio to sheet music: convert to MIDI first, then open the .mid in a notation editor. That page shows a real test score from our path.
I have one instrument or a drum loop
Piano · Vocal / humming · Guitar · Drum loop / stem. See honest routing below for full mixes.
All audio tools on this site (table)
One row per live path. Open the deep link when the input and output match your job.
| Tool | Input → output | Best when | Open |
|---|---|---|---|
| MP3 to MIDI (home) | MP3 / WAV / M4A / FLAC / … → MIDI | Default pitched audio → notes | / |
| Audio to MIDI converter | Same cluster → MIDI | Formats, free vs paid, no-upload checks | /audio-to-midi-converter |
| MP3 to WAV (highlight) | MP3 → WAV (PCM) | DAW / video / speech need uncompressed audio | /mp3-to-wav |
| WAV to MIDI | WAV → MIDI | You already have WAV; tips for cleaner notes | /wav-to-midi |
| MIDI to WAV | MIDI → WAV | Render notes with SoundFont to PCM | /midi-to-wav |
| MIDI to MP3 | MIDI → MP3 (WAV optional) | Shareable audio from a .mid | /midi-to-mp3 |
| MP4 to MIDI | MP4 / MOV audio → MIDI | Extract video audio, then notes | /mp4-to-midi |
| Piano to MIDI | Piano recording → MIDI | Solo piano / chords | /piano-to-midi |
| Vocal to MIDI | Singing / humming → MIDI | Dry single voice | /vocal-to-midi |
| Guitar to MIDI | Guitar recording → MIDI | Riffs / chords (not tabs) | /guitar-to-midi |
| Drum to MIDI | Drum loop / stem → MIDI | Kick / snare / hi-hat map | /drum-to-midi |
| Audio to sheet music | Audio → MIDI → score | Notation after transcription | /audio-to-sheet-music |
| MIDI converter (directions) | Audio↔MIDI explained | Round-trip overview + test files | /midi-converter |
Guides (start here if stuck): How to convert audio to MIDI · WAV vs MP3 same-melody test · MP3 to MIDI not working?
Highlighted tool: MP3 to WAV
Use /mp3-to-wav when the job is PCM, not notes. Decode one .mp3 in the browser (no upload), choose sample rate / bit depth / channels, or tap CD (44.1 kHz 16-bit stereo), Video (48 kHz) or Speech (16 kHz mono) presets. Default caps match the homepage: 50 MB / 3 minutes.
Decoding does not restore detail MP3 already discarded — the WAV is larger PCM of the same decoded samples. If your real goal is MIDI, skip recompression and open home, audio to MIDI or WAV to MIDI instead.
Where full mix, drums and vocals should go
This site does not separate a finished song into stems. Route by what you actually have:
- Full mix (vocals + drums + bass + chords together): Expect a dense, overlapping MIDI if you run the pitched converters. Better: solo or bounce the part you care about in a DAW, then convert that stem. The homepage FAQ states the same limit.
- Drums / percussion loop or drum stem: Use drum to MIDI (kick / snare / hi-hat on the General MIDI drum channel). Do not use piano/vocal/guitar pages or the pitched homepage path expecting a drum map — those look for pitched notes.
- Dry vocal or humming: Use vocal to MIDI (or the voice section on audio to MIDI converter). A vocal buried in a full mix is not isolated automatically.
- Isolated piano or guitar: piano to MIDI or guitar to MIDI, or the homepage with that solo file.
What this hub adds (formal exclusive note)
The information gain on this URL is goal-based navigation + the decision tree + the input→output tool map + honest mix/drums/vocals routing — not a new converter. Ranking pages for “audio converter” style queries are usually upload forms or single-format tools; this page’s job is one-jump routing across the live mp3tomidiflow cluster.
Method note: this hub describes tools on this site only. No invented volumes, rankings, or untested accuracy percentages.
Audio → MIDI → audio: did the notes survive?
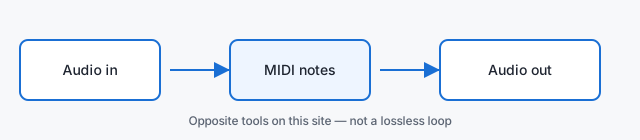
A playable MIDI file is only the beginning. MIDI describes a performance; an instrument generates the sound. A different instrument tone alone does not prove that the transcription failed. Compare the notes and timing separately from the sound of the instrument. The MIDI Association explains this distinction.
Set up one fair comparison
- Keep the original recording. Choose a short, clearly audible melody phrase and mark eight consecutive intended notes, including a repeated note or a pause if available. Eight notes is a practical review sample, not a converter limit or accuracy benchmark.
- Open the exported MIDI in your own MIDI-capable editor or DAW. Assign an instrument with a clear attack and short release, disable added effects, and leave note editing, quantization, and transposition off for the first check. This preparation happens in your editor; these are not claimed hub features.
- Play the original phrase and MIDI playback at comparable listening levels. Align their first intended note, then compare at the original speed without stretching either performance. Use the piano roll to inspect anything you hear as a mismatch.
| Check | Pass | Fail and next action |
|---|---|---|
| Playback setup | The assigned instrument sounds when you trigger a known note in the editor, and the imported MIDI produces audible playback. | If a known note is silent, fix instrument assignment or audio output first. If the known note sounds but the import is silent, inspect imported notes, track mute, routing, and note velocities before judging pitch accuracy. |
| Pitch and octave | Each of the eight target notes has the intended pitch and octave. | A wrong pitch or octave fails this check. Correct the identified notes in your editor; a brighter instrument does not correct a wrong octave. |
| Missing or extra notes | Each target attack has one corresponding MIDI note, with no unintended notes in the selected melody phrase. | A missing attack, duplicated note, or note during a marked pause fails. Inspect those events individually. Do not count intended accompaniment as an error when reviewing a full arrangement. |
| Rhythm and drift | After aligning the first note, later target attacks stay together and preserve the phrase's long and short rhythmic pattern. | Growing separation calls for a tempo/import check; isolated early or late notes call for onset inspection. Diagnose this before applying quantization. |
| Note endings and gaps | The MIDI note lengths preserve intended held notes, separations, and rests in the sample. | A cut-off held note or a MIDI note bridging an intended rest fails. Inspect note lengths and sustain-controller events; distinguish those from the playback instrument's release tail. |
Acceptance rule: accept this sample only when every check passes. If a pitch, octave, or boundary cannot be established from the source, record “Not assessed” and keep the result unverified. After any edits, replay the same sample. Then check the rest of the intended passage, especially dense or sustained parts: an eight-note pass does not validate the whole recording.
Why does MIDI playback sound different from my original audio?
The playback instrument supplies the tone; MIDI does not preserve the original recorded voice or instrument sound. If pitch, octave, attacks, and note lengths pass the comparison, a tone difference alone is not a transcription failure. If notes are wrong, changing the playback instrument does not fix them. This checklist uses your own editor and makes no promise of built-in rendering, stem separation, chord transcription, or automatic correction.
Method note: This hub’s round-trip listening audit is a navigation/editorial model for tools on this site — not an industry standard or accuracy claim. formal% / FULL10 unavailable (not obtained).
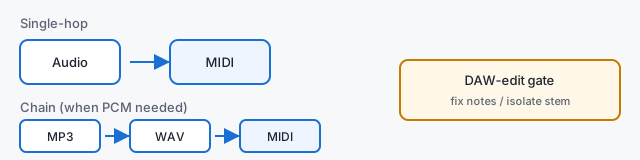
MP3 to WAV to MIDI, or direct: when is the extra step useful?
Use direct audio-to-MIDI when the transcriber accepts your MP3 and the recording is ready; add a WAV handoff when it solves an input-format requirement or carries an intentional audio edit. Decoding an MP3 to WAV alone does not recover discarded audio detail or guarantee better note detection. If you have the original lossless recording, use that source instead of making a WAV from the MP3.
The DAW-edit gate: what actually needs to change?
Before adding another conversion, decide whether the problem is the accepted file format, the recorded sound, or the extracted notes. A digital audio workstation (DAW) gives you separate places to edit audio and MIDI; choose the one that contains the problem.
| Your situation | Useful next step | What justifies that step |
|---|---|---|
| The transcriber accepts MP3; you need no source edits | MP3 → MIDI | There is no format or editing requirement for an intermediate WAV. |
| The chosen transcriber requires PCM WAV | MP3 → PCM WAV → MIDI | The WAV makes the recording compatible. It does not make the source more detailed. |
| You need a selected phrase or an available isolated instrument track | Audio → DAW edit → PCM WAV → MIDI | The edit changes what is transcribed. If the editor accepts MP3, import it directly and export WAV after editing. |
| The MIDI is usable except for a few wrong pitches, split notes, or note lengths | MIDI → piano-roll edit | Correct those note events directly rather than repeating an unchanged audio conversion. |
A WAV made from a full mix still contains that mix. It does not isolate a vocal or turn overlapping instruments into a single melody. Use a separately recorded part when available, or a transcription mode suited to the material. Widespread wrong notes call for reviewing the source and transcription method before committing to manual cleanup.
Keep the WAV handoff editable and aligned
- Choose the export boundary deliberately. Keep the original recording. Export only the intended track or phrase, and leave enough room for the final note to end. A cropped phrase can start at zero in its new file even though it started later in the song.
- Record the timing reference. Note the crop's original start position and the DAW tempo or tempo map. Keep time stretching and pitch shifting unchanged unless they are intentional edits. Place the returned MIDI against the same reference; do not assume that a transcription export preserves the song's tempo map or original offset.
- Make a real PCM export. Use settings accepted by the next tool, rather than renaming the extension. Avoid another MP3 export between editing and transcription. Increasing sample rate or bit depth cannot restore information already lost in the MP3.
Stopping rule: if you cannot name the compatibility requirement or source edit that the WAV enables, skip that extra hop. Once you have MIDI, use the existing round-trip listening audit to assess the result.
Questions about conversion chains and DAW edits
When should I convert MP3 to WAV before converting to MIDI?
Convert to WAV first when the next tool requires it or when you need a WAV export of an edited audio part. If your editor accepts MP3, edit there directly and export the prepared part once, rather than adding a preliminary format conversion.
Does MP3 to WAV conversion make MIDI transcription more accurate?
MP3-to-WAV conversion alone does not guarantee more accurate MIDI or restore audio detail lost during MP3 encoding. A genuinely better source recording or a useful source edit can change the input; the file extension alone cannot.
Should I fix mistakes in the audio or in the MIDI?
Fix a few incorrect note events in the MIDI, and address unsuitable source material before transcribing again. For example, adjust an isolated wrong pitch in the piano roll; use an available solo track when accompaniment is confusing the transcription.
How do I align MIDI made from a cropped WAV with the original song?
Place the MIDI at the crop's original start position and check it against the original audio using the same project timing reference. Verify the first note and a later phrase before applying quantization; cropping offsets, tempo interpretation, and transcription timing errors need different corrections.
Stem or full mix? Check what is inside before choosing a MIDI path
Choose by the audible parts and the notes you want, not just the filename or instrument label. An isolated instrument can play several notes at once, and a file named "vocals" can contain a lead singer plus harmonies. A source stem and a single melody are different things.
Answer two questions before using the table: What can I hear together? And do I want all of those notes or only one line? Read across the matching row. Each link leads to the relevant on-site workflow; this is a routing quiz, with no audio processing on this page.
| What I actually have | What I need | Next on-site page | When to stop or choose a different source |
|---|---|---|---|
| A dry vocal, or a stem labeled "vocals" | Only the lead melody as MIDI | Vocal to MIDI, once the recording contains the intended single voice. | Listen for backing harmonies and overlapping vocal doubles. A vocal stem can still contain several lines; do not treat its filename as proof that the lead is isolated. |
| Solo piano with chords or two-hand playing | All played pitches as MIDI | Piano to MIDI; simultaneous notes require polyphonic transcription. | If you want only the top melody, that is a narrower task than transcribing the piano. Do not assume accompaniment notes are errors or that an instrument-specific page selects one hand. |
| One guitar playing a riff, arpeggio, or strummed chords | The played pitches as MIDI | Guitar to MIDI, with a clean guitar recording when available. | Ringing strings can overlap even in a solo part, and distortion can add misleading harmonics. If you need exact strings and frets, MIDI pitch alone cannot identify the original fingering. |
| A drum loop or drum stem | Drum-hit events for a kit | Drum to MIDI; check the page's documented drum classes and output map. | Do not assume that a drum stem makes every tom or cymbal type identifiable. Also distinguish kit hits from a tuned percussion melody: they need different interpretations. |
| A marimba, vibraphone, or other clearly pitched percussion line | Melodic pitches as MIDI | Audio to MIDI converter for pitched-note transcription. | Do not choose a kit-hit mapper just because the instrument belongs to the percussion family. The needed output is musical pitch, not a kick, snare, or hi-hat label; results still depend on the recording. |
| Only a finished stereo mix, with no separate source tracks | One named instrument or the lead vocal alone | Read the audio-to-MIDI limitations; hold the conversion for this goal. | There is no separate instrument track to solo in that stereo file. Obtain an isolated part or record the desired line separately before choosing its instrument path; switching page labels cannot supply the missing part. |
A separated stem still needs a content check
A separator may group sources into categories such as vocals, drums, bass, and "other." The "other" file can still combine piano, guitar, and additional accompaniment. A vocal file can still combine several singers. Listen to the actual export before assigning it an instrument path; its category name does not guarantee the part you need.
Channel check: splitting stereo into left and right gives you channels, not automatically instrument stems. A channel is useful as an isolated source only if the desired part is already separate there. Sounds mixed together within that channel remain mixed.
Questions about stems, chords, and choosing a part
Is a solo piano recording automatically a single melody?
No, a solo piano recording can contain chords and several simultaneous musical lines. "Solo" describes the source instrument, while "monophonic" means one note at a time. Decide whether you want the whole performance or only its melody before treating extra lines as unwanted notes.
Does a vocal stem contain only the lead singer?
No, a vocal stem can also contain backing singers, harmonies, and doubled parts. If your goal is a single lead line, check whether that line is actually isolated before following the vocal-to-MIDI workflow.
Can I isolate an instrument by choosing the left or right channel?
Only if that channel already contains the isolated instrument; selecting a channel does not separate sounds mixed within it. Listen to each channel on its own before relying on an unusual split-channel recording as a source.
Can I send an "other" stem straight to piano to MIDI?
Only if its actual contents match the piano part you want to transcribe. "Other" is a separator category, not a guarantee of solo piano; it may also contain guitar and other accompaniment. Choose by what is audible in the file.
Tempo map and clip bounds: get a usable grid before audio-to-MIDI
Set a tempo reference and deliberate in/out points on the source before you convert. Pitch detection writes note events; it does not invent a stable project grid for you. A file that drifts in speed, starts mid-phrase, or ends on a ringing tail produces MIDI that looks busy even when the melody itself is clear.
This block is a pre-converter checklist only. It does not change how the converter runs. Use it on the audio you already chose (after the stem/mix routing quiz when needed), then open the audio-to-MIDI converter with a tempo-ready clip.
| What to decide first | Practical step on the source | Pass condition | Hold or fix before converting |
|---|---|---|---|
| Working BPM (or tempo map) | Tap or detect tempo against a clear downbeat section; write the BPM you will use in the DAW. If the recording changes speed, note region BPMs instead of one global number. | You can name one BPM (or a short region list) that matches the audible pulse for the clip you will send. | Do not convert a clip whose pulse you cannot state. A guessed BPM makes later quantization fight the MIDI instead of cleaning it. |
| Clip in-point | Start on a musical boundary: bar 1 of the phrase, or a counted pickup you intend to keep. Leave a short silence or room tone before the first attack only when the first note itself must stay intact. | The first intended note is fully inside the file; you recorded the original song position of that in-point. | Stop if the export starts mid-note or mid-word. A chopped attack becomes a wrong onset, not a style choice. |
| Clip out-point | End after the last intended note releases. Include enough tail for natural decay; exclude the next unrelated phrase, talkback, or click that follows. | The last wanted pitch finishes inside the clip; nothing after it competes as a new onset. | Trim talk, count-ins after the take, and the next section. Extra late events clutter MIDI and hide where the phrase actually ended. |
| Grid vs free time | Decide whether the take should sit on a fixed grid after conversion, or stay as free timing that you will edit by ear. | You know whether quantization is a later step or off-limits for this take (rubato, rallentando, live push/pull). | Do not plan heavy quantization on a rubato vocal or a ritard ending until you have checked the MIDI against the audio at the same tempo reference. |
| One clip, one intent | Export the shortest continuous region that contains only the part you want transcribed at this BPM. | The clip has one musical job (one phrase or one loop) and one tempo story. | Split tempo-change medleys and multi-section dumps into separate clips. Mixing two grids in one file is a source problem, not a converter setting. |
Minimum write-down before you open the converter
- BPM or region list — the number(s) you will place on the project timeline.
- In-point label — bar/beat or original timecode where this clip begins in the song.
- Out-point rule — “through last note release” or a named bar, not an arbitrary silence cut.
- Grid intent — “quantize later to this BPM” or “keep free timing.”
With those four notes, run the browser audio-to-MIDI converter on the bounded clip. After download, place the MIDI at the recorded in-point and compare the first attack and a later downbeat to the audio before you quantize. Timing fixes belong to the grid you prepared; they are not a substitute for choosing a cleaner stem (see the stem/mix quiz above).
Questions about tempo maps and clip bounds before MIDI
Do I need a tempo map before converting audio to MIDI?
You need at least a working BPM (or short region list) for the clip you will convert. The converter detects pitches and onsets; it does not replace a project tempo you can reuse when you drop the MIDI onto a timeline. Write the BPM down before you export the clip.
Where should I cut the in-point of a clip for audio-to-MIDI?
Cut on a musical boundary so the first intended note is complete inside the file, and record where that point sits in the original song. Starting mid-note creates a false onset; starting at a random silence without a label makes later alignment guesswork.
How much audio should I leave after the last note?
Keep enough of the natural release for the last pitch to finish, then stop before the next phrase, click, or talkback. A long empty tail is usually harmless; late unrelated onsets are not.
Should I quantize before or after audio-to-MIDI?
Prepare the tempo reference and clip bounds first, convert, then decide quantization against the audio at that same BPM. Quantizing MIDI to a guessed grid, or time-stretching the source without updating your written tempo, mixes two timing errors. Rubato takes may need little or no quantization.
Silence gate and mono vs poly routing before audio-to-MIDI
Before you hit convert, decide two routing facts the converter cannot infer from a filename: how much leading/trailing noise you will keep, and whether the clip is effectively one pitch line or several. Wrong answers create false onsets or merged chord soup — different failure from tempo/clip bounds (covered 2026-11-04) or stem-vs-mix (2026-11-03).
Silence / noise-floor gate checklist
| Check | Pass | Fail → fix |
|---|---|---|
| Leading pad | ≤ ~0.3 s of near-silence before first intended note | Trim talkback, chair noise, or count-ins that look like onsets |
| Trailing pad | Natural release of last note, then stop | Cut coughs, next phrase, or click track after the take |
| Noise floor | Hiss/rumble clearly below the quietest note you care about | High-pass gently or re-record closer; do not crush with a brickwall gate that chops note starts |
| Breath / fret noise | Only if you want those as MIDI | Edit or mute regions that should not become notes |
Monophonic vs polyphonic routing
| Clip content | Route | Why |
|---|---|---|
| Single sung or played melody, no harmony | Monophonic / melody path (homepage or matching instrument page) | One pitch track is what pitched models expect |
| Two+ simultaneous pitched parts in one file | Split or solo first; do not expect clean multi-voice MIDI from one pass | Overlapping onsets collapse into wrong chords or dropped inner voices |
| Drums only | drum to MIDI | Different detector family than pitched melody |
| Dry vocal with light doubles | Prefer the loudest dry take; mute doubles | Doubles look like parallel pitch tracks |
Stopping rule: if you cannot say whether the clip is one line or several, solo in a DAW first. After convert, use the round-trip listening audit — do not re-trim tempo here; that is the 1104 block.
Questions about silence gates and mono vs poly routing
Should I noise-gate the audio before converting to MIDI?
Only if residual hiss or room noise is creating false notes. Use a gentle gate or manual trims so real note attacks stay intact. A gate that chews the start of each note is worse than a little hiss.
Can one convert pass separate two melodies in the same file?
Do not count on it. Solo or bounce each line, convert separately, then merge MIDI takes in your editor. Stacked pitched parts in one clip are a routing problem, not a tempo problem.
Is a count-in safe to leave in the file?
Usually no. Spoken counts and stick clicks become onsets. Trim to the first musical note (or a short silent pad), and keep your tempo reference written down from the 1104 prep step.
Mono file vs mono melody — are they the same?
No. A mono WAV can still hold a chord or two singers. “Monophonic routing” means one intended pitch line, regardless of channel count.
Peak headroom / clip-flag checklist before audio-to-MIDI
Before converting, make the level and clip status explicit for the audio you will send. This peak/clip check is separate from the silence gate in 1105 and the tempo/clip bounds in 1104.
| Check | Practical step | Pass | Hold/fix |
|---|---|---|---|
| Peak dBFS / clip flags | Open the source in a meter/DAW; note true peak or clip indicators on the region you will send. | You can state whether any sample hits 0 dBFS or shows clipping. | If clip flags exist, fix gain and re-export from an unclipped source, or choose a cleaner take. Do not hope the converter ignores clips. |
| Headroom vs normalize-to-peak | Decide whether to leave −1…−3 dBTP headroom or peak-normalize. Write the choice down. | The choice is explicit before export. | Peak normalization that raises the noise floor can lead to spurious onsets, especially on quiet tails. Once the level is sane, use the 1105 silence-gate check. |
| Normalize type | Peak normalize ≠ loudness (LUFS) normalize. For transcription, peak/clip safety matters first. | You know which normalize type you applied. | Loudness normalization that raises noise without fixing clipping still fails the clip row. |
| Hotter export when useful | A hotter export is OK when the take is clean, mono/line-like, and meters show no clipping. | Hot + clean + no clip flags. | Hot + clipped: fix the source. Hot + dense polyphonic mix: follow the stem route before converting. |
| One intent | Keep the same clip bounds and tempo decision as 1104; this block only adds level/clip discipline. | The level decision does not reopen the tempo edit. | Keep tempo and clip-bound decisions in 1104. |
Stopping rule: If clip flags exist, fix or re-export the source before converting. Lowering the level of an already clipped recording does not restore the damaged peaks; use an unclipped source or a cleaner take.
Questions about peak headroom and clip flags before audio-to-MIDI
Should I normalize before audio-to-MIDI?
Normalization is optional. Choose either −1…−3 dBTP headroom or peak normalization and record the choice before export. Resolve clip flags first; raising gain also raises existing noise, which may produce spurious onsets on quiet tails.
Does clipping create extra MIDI notes?
Clipping can add distortion that a transcription system may interpret as false onsets or pitches, so extra notes are possible, not guaranteed. If clip flags appear, fix or re-export the source before converting; reducing gain on an already clipped file does not repair its peaks.
Peak normalize vs loudness normalize — which matters for transcription?
Peak normalization sets gain relative to the highest peak; loudness normalization targets a loudness level measured in LUFS. For transcription, check peak/clip safety first. Loudness normalization that raises noise without fixing clipping still fails that check.
When is a hotter export better?
A hotter export can be useful when a clean, mono/line-like take is unnecessarily quiet and the gain increase leaves no clip flags. Fix a clipped source first. For a hot, dense polyphonic mix, follow the stem route before converting.
Audio tools FAQ
Should I convert MP3 to WAV before converting to MIDI?
Usually no. The homepage and audio-to-MIDI path already accept MP3, WAV, M4A, FLAC and more. Convert to WAV first only when you need an uncompressed file for a DAW, video timeline or speech tool — use the MP3 to WAV page for that. Our same-melody test did not show a cleaner MIDI from WAV alone.
Can I convert multiple audio formats at once on this site?
No. Each converter runs one file at a time. Pick the tool that matches your goal, convert one file, download, then choose the next file. There is no batch queue on these pages.
Which tool should I use for a full mix with drums and vocals?
Do not expect one clean MIDI from a full mix. Solo or bounce the part you care about, then use the matching path: vocal to MIDI for a dry vocal, drum to MIDI for a drum loop or stem, piano/guitar pages for those instruments, or the homepage for a single pitched melody. The pitched models do not separate a mix into stems.
What is the difference between audio to MIDI and MIDI to WAV?
Audio to MIDI detects notes from a recording and writes a .mid file. MIDI to WAV (or MIDI to MP3) is the reverse: a SoundFont plays the notes and records audio. They are opposite directions on this site.
Where do I go for sheet music from audio?
Use audio to sheet music: convert audio to MIDI in the browser, then open the MIDI in a notation editor. That page shows a real test score from our converter and why tempo setting matters.
Are these audio tools free and private?
Yes. Core converters run in your browser with no account and no daily quota. Audio is not uploaded for conversion. Site analytics use Google Analytics 4 (G-FXQK42WDKH); see Privacy for details. Site context: About.
Related converters and trust pages
MP3 to MIDI (homepage) · MP3 to WAV · audio to MIDI converter · WAV to MIDI · MIDI to WAV · MIDI to MP3 · About · Privacy · Contact